Tuesday, May 7, 2019

home brew 6m loops

How I built loops to get on the air for 6 meters.
When I went searching for information on 6-meter loops I found many many very well written construction articles but several of them had one thing in common: when it got to the antenna match they were often using old parts that were not weatherproof or not commonly available or the match would be built using something that the builder had in his junk box that wouldn't be duplicatable.

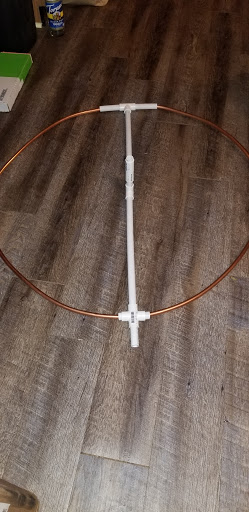
this was the basis for the loops I built, and provided the basic PVC support and loop dimensions.

I finally came across a design that used aluminum fuel hose and had a gamma match that was very duplicatable so I synthesized that into what I built for my six meter loops.

I built three loops so I could use two at the home qth and have one portable and I devised two different mounting methods where the antenna mounts to a mast that goes to the center of the loop or can be built for mounting on the side of a tower.

I jokingly call this antenna the 99 and 56/100 home Depot loop because I don't want to get a cease-and-desist order from a certain soap company and because the only pieces that you can't get at Home Depot are the UHF connector, the segment of rg213 that you'll need, and perhaps the heat shrink tubing that I used.
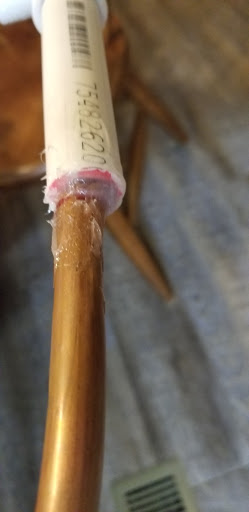
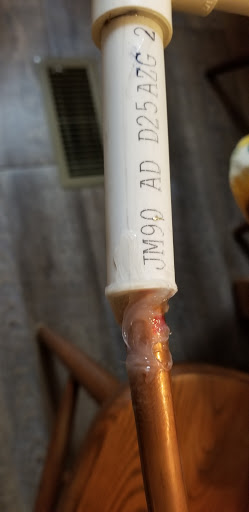
The copper pipe mounts into some PVC that forms the support for the antenna.
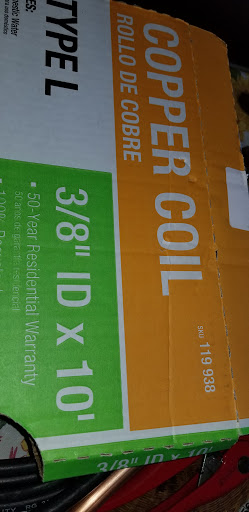
I used ⅜” ID for the main loop.

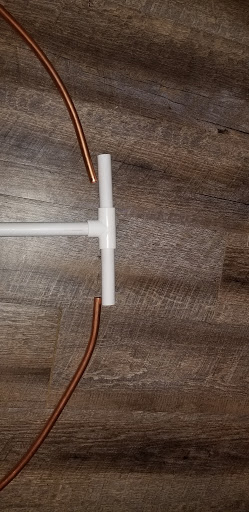
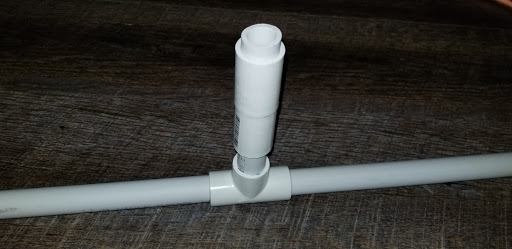
 the gamma match is a segment of rg213 center conductor/insulation (braid and jacket removed) that slides into a smaller diameter (⅜” OD) copper tube.

 a copper pipe bracket is flattened and soldered to the loop and gamma match tube. This, plus the feed connector, provided mechanical support for the match tube.

  The UHF connector is bolted to wires soldered to the loop that emerge via slots cut in the pvc tee to support the antenna connector. I bent 1 wire to slide the wires into the PVC TEE, then bent it back.
once positioned, I cut the wires to length, and instaled a solder lug to bolt the UHF conenctor in place.

I used silicone RTV to seal and protect various pieces to keep moisture out and I also made a bit of a silicone plug for the end of each open tube such as the bottom of the mount or the end of the gamma match.


I also put silicone on the back of the antenna connector to protect the connection to the RG 213 center conductor.

the match is rather simple in that it is 14 inches of copper tube with a 14 inch piece of center conductor of rg213 with about 2 and 1/2 inches of the center conductor exposed.

using an antenna analyzer I tweaked the jumper from the gamma match tube to the main loop for best match and then soldered those in place with a plumbing torch. I used wooden clothes pins to hold the gamma tube in place during tuning as this allows the strap to be positioned for best match.  Once the match location is found, mark the tubes and remove the pin on the main loop and slide the match wire out. Then using the torch, solder the strap in place. Once this is cool, replace the coax center conductor and secure to the main loop again. Solder the strap to the main loop.
this solder joint plus the stiffness of the wire to the UHF connector provide adequate support for the matching component.

I built two 3/4 wave Length of 75 ohm RG6 coax so that I could stack the antennas 5/8 wave apart on a mast
The loops are simply hose clamp connected to the mast that goes through the center of the loop.

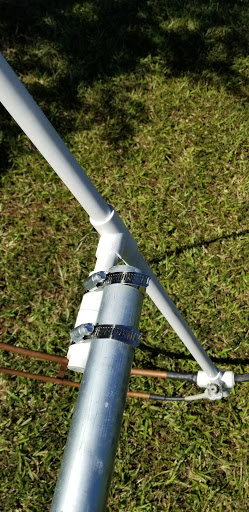
one downside is that this means that the loop is not grounded to the mast so you may want to leave a couple of feet of mast tube of the loop for any kind of lightning protection.

I've added several photographs showing the PVC support and the loop construction and also illustrating the sidemount method of mounting the loop (note that this loop is laying upside down on the floor.  I rotated the image to try to show the intent)


metal prices have risen so the antenna may not be as cheap as some of the other articles refer to.
I think I built these for maybe $100 total in materials.

The loops are currently on a mast I made with double wall construction consisting of 1-1/4 inch and 1-1/2 inch EMT metal tube.

I cut one piece of 1-1/4 inch EMT to five feet and put it inside so that the joints are offset 5ft within the mast. The mast is currently attached to the side of my house at about 14 ft and is 35 ft freestanding with loops mounted at 23 and 35 feet.
As always your mounting method is your choice and your mileage may vary

73 and gud luck!!
KI4US

Saturday, May 4, 2013

about to try the 30/month t-mobile basic plan.
got a GSM motorola atrix HD on the way. this seems to support teh 4g t mobile bands.

the plan is to use VOIP with google voice and pbxes.org to make phone calls via data.

I had tried this with my sprint, and the result was OK. driving, handoffs would cause a but of voice drop, and wifi was spotty in some places at home.  I fixed that by taking a router and programming it with DD-WRT and making a repeater.
http://www.ebay.com/itm/Dual-Band-VHF-UHF-Ham-Commercial-MURS-and-GMRS-versions-Base-Station-Antenna/121096022040?ssPageName=WDVW&rd=1&ih=002&category=4672&cmd=ViewItem

just bought one of this antenna.  I plan to side mount this to a  tower as follows:
it will be similar to this but straight out.

the antenna requires 5' of 3/4 PVC and includes the pipe ends.

I plan to use 4 PVC Tee connectors to make standoffs to mount to the side of a tower.

the 5' of PVC will be shortened to  4' 6", and at each end, a TEE will be mounted, then short pieces of pipe will finish out the 5' length.
the other 2 tees will be cut so they can hose clamp to the tower leg.
I plan to make the standoffs about 2' each, and they will be sealed with RTV at each end to keep stuff from being able to get to the antenna parts in the main pipe.

4 stainless hose clamps will hold the assembly to the tower.

sort of like this dipole side mount:
http://www.w9cva.org/documents/Side%20Mount%20Dipole%20Antenna%20Support%20For%20Rohn%20Tower.pdf

Monday, June 4, 2012

standing to work

make a stand up desk:
I like the look and feel of a rough (and cheap...) work surface
historically, my workbenches have been a door on some shelve.
cheap and functional.

To make a stand up desk, I got 2 of these shelves from walmart:
http://www.walmart.com/ip/Sauder-Beginnings-3-Shelf-Bookcase-Oregon-Oak/13269114
These shelves are 35.25 inches high.
A door like this one
http://www.homedepot.com/Doors-Windows-Doors-Interior-Doors/h_d1/N-5yc1vZar1h/R-100034380/h_d2/ProductDisplay?catalogId=10053&langId=-1&storeId=10051

and some 2x6 lumber cut to the width of the shelves.

Put the shelves into a wide vee shape, put the 2.x 6 on top of the shelves 3 deep, and put the door across the whole thing.  The work surface should be just below elbow level (44" for me. I am kinda short...)

This provides an awesome 30x80 work surface.

Of course, you can also look at ikeahacks if you want something more polished.

I have a 2nd desk that I wanted to raise as well.  This one if a (probably) Sauder desk made from veneered particle board.

It has 2 pedestals, one with a door, and 1 with drawers. the door side is narroweer than the drawer side.
Mine happens to be 29.5 inches deep, and the door pedestal is 12.75 wide and the drawer side is 15.25 wide.

I need to raise this by 8 levels of 2x2.  I got 14 8 ft 2x2 from home depot.
http://www.homedepot.com/Lumber-Composites/h_d1/N-25ecodZ5yc1vZbqpg/R-202518911/h_d2/ProductDisplay?catalogId=10053&langId=-1&keyword=2x2&storeId=10051
of course, these are actually 1.5" x 1.5"

I plan to place them interlocking, so I will cut each side 1.5" shorter than the desk size.
the 29.5" depth will be cur 28", the 12.75 will be cut 11.25 and the 15.25 will be cur 13.75.

since I need to lift by 8 layers of wood, I will need 32 of the long length and 16 each of the short lengths.
I will run a small bead of white wood glue along the wood for some extra stability.

NO MORE OFFICE CHAIR!!!

Wednesday, November 2, 2011

well, it has sure been a while. all the running, 0 lbs off. no more running, 0 lbs on. and some off...

so, the reader's digest version of my weight adventure?

in the around 2000, went on atkins type low carb diet. dropped about 30 lbs. I got to right at 200, but got frustrated at not getting below, and eventually fell off the low carb. the weight slowly came back later (with friends.) atkins lifestyle was hard to maintain then, since I love roadhouse grill rolls.

since then, with lots of life stress, I got up to about 275 (278 is top on dr scales, fully clothed, after lunch)

with sparkpeople.com food tracking, I dropped to about 235 just by eating less (I joked that I developed a new exercise - pushbacks, as in "push back" away from the table.)

as time went on, and I again lost focus due to life and enjoying food, I got back up to and held right at 250.

then in August 2011, I used a very low calorie diet (think hcg, but without shots... 500 cals/day) to drop to about 220, then crept back up to and held for at 225 for Sept and October.

With renewed focus, I realized that I had been able to 'step' down a level and hold, and I decided to find a new diet to take weight off for the 'next step'

This is what I found with the help of Pastor Jason at therevolution.tv where we do church:

where my basic formula is:
(half of body weight in lbs) = ounces of water per day. I usually try to get > 1 gallon
(half of body weight in lbs) = grams of protein/day. this is the harder part right now. (Damn, I miss potato chips...)

so that is a minimum of 110 oz water and 110 g protein. as little carbs as possible, and nearly zero sugar.

This is very much like atkins, but low fat as well.

my day will look like this when I am in the office and in complete control. Too many times, I lunch with customers, making this impossible...

breakfast
coffee with splenda
2 scoops protein powder (56g protein) in 16 oz water.
vitamin supplements fiber, probiotics, multivitamin, 3 g C (note: not mg...)

mid morning
32 oz water

lunch
caf free diet coke (24 oz) or tea with splenda
2 scoops protein powder (56g protein) in 16 oz water.
spinach salad with bacon bits, salad toppings, a bit of grated Parmesan cheese and Ken's light vidalia onion vinaigrette.

mid afternoon
32 oz water

dinner
2 scoops protein powder (56g protein) in 16 oz water.
spinach salad with bacon bits, salad toppings, a bit of grated Parmesan cheese and Ken's light vidalia onion vinaigrette.
steamed vegetable like green beans, broccoli, or cauliflower.
(sometimes) grilled steak or fish

evening
32 oz water

total water 3x32 + 3x16 + 8 coffee + 24 soda or tea = 176 oz water per day.
current weight: 220.4

I found body fortress whey protein (fortunately, I have no problems with this formula. Carol does and requires egg protein) in vanilla, chocolate and strawberry. Walmart has a nice price on 2lbs for 14.99
http://www.walmart.com/ip/Body-Fortress-2lb-Chocolate-Whey-Protein/10322406
http://www.walmart.com/ip/Body-Fortress-2lb-Vanilla-Whey-Protein/10322404

online, walmart also lists cookies and crema as well chocolate peanut butter

I also found this:
https://www.bodybuilding.com/store/true-science/clean-protein.html
in cookie-n-cream and banana creme each for $22/6 lbs


maybe this can help if you are looking for protein supplements.

Tuesday, July 14, 2009

1.79 mi at 140bpm is too slow...

oh well. this was almost too hard to jog to, but I still felt my stride length shorten as I tired.

back to 150bpm tomorrow...

1.5mi at 150bpm

trying to lengthen my stride.

the 1st 0.5 mile in the run was at 12:30/mile, then I dropped to 13:15mi, then other than about
50 yards of walk near the end, I hel at 13:00/mile to finish.

Next run will be slightly less bpm (145) to try to get longer stride again.